This article may contain affiliate links where we earn a commission from qualifying purchases.
Key Takeaways
- DIY rain barrel systems are effective and affordable ways to collect water for your garden.
- Ensure the rain barrel is clean and free of residue before beginning installation and choose a proper location on your property near a downspout.
- The main steps to build a rain barrel include drilling a hole for the spigot and attaching it with caulk or plumber’s tape to create a watertight seal.
- Rain barrels are great for gardening purposes such as watering plants, but they can also be incorporated into plumbing systems and even drinking water.
- Maintenance of the system is often seasonal, with basic cleaning and disassembly during winter months.
Rain barrels are environmentally-friendly contraptions that collect and store rainwater from your gutters, which can be used for various household purposes.
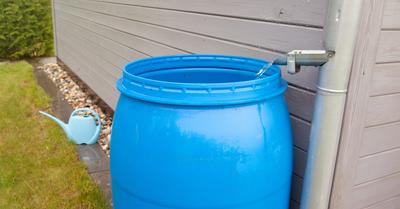
A DIY rain barrel can be made with just a few simple tools and materials. You need to decide between a plastic or wooden barrel, and then choose a suitable location on your property to make the connections to let the water from your roof and gutters flow into the barrel instead of the ground.
In this article, we will guide you through step-by-step instructions to build your very own rain barrel, as well as share the benefits of doing so. With our expert knowledge, you can trust that this environmentally-friendly DIY project will be successful and light on your wallet. Let's get started!
Choosing a Rain Barrel
When selecting a rain barrel, there are various aspects to consider. These aspects include size, material, aesthetics, and functionality.
In this section, we’ll guide you through these factors to help you make an informed decision when setting up a rain barrel at home.
Size and Material Options
Rain barrels come in a wide range of sizes, typically ranging from 45 to 90 gallons.
The size you choose should be based on available space, personal preferences, and the anticipated amount of rainfall you want to collect.
A larger roof area will collect more water, so plan accordingly. The most common materials used for rain barrels include plastic or wood. Avoid using cheap options such as trash cans, as they are less reliable.
Plastic
Plastic rain barrels can be made of recycled plastic or food-grade material, ensuring safe water storage for garden use. They are a popular choice due to their durability, lightweight construction, and affordability.
Some designs are also UV-protected, reducing algae growth and maintaining the integrity of the barrel.
Wood
Wood offers an attractive, traditional appearance but may require more maintenance.
Wooden rain barrels often use oak or cedar, known for their water-resistant properties. However, the heavier weight and higher costs are worth keeping in mind as you make decisions.
Aesthetics
Considering aesthetics helps to ensure the rain barrel fits well with your home and garden design.
Some rain barrels come in bright colors while others have a more natural appearance, resembling terracotta or stone. You can even find rain barrels with artistic designs, allowing you to express your personal style.
Functionality
Functionality also plays a crucial role in choosing the right rain barrel. Essential features to look for include a tight-fitting, removable lid to prevent debris and pests from entering, and a high-quality spigot for easy water access.
An overflow mechanism such as an overflow hole is important to prevent issues. You can make a hole at the top of the barrel, as highlighted by HGTV. More on this later!
User-Friendliness
Installing a rain barrel system should be user-friendly, with clear instructions and minimal tools required for assembly.
This is not a very difficult project and most homeowners will not have issues setting up a rain barrel at home with our instructions. However, there are plenty of complex systems that may require expert knowledge and experience with tools.
DIY Rain Barrel: Step-by-Step Instructions
Materials Needed
To build your rain barrel, you'll need the following materials and supplies:
- Food-grade plastic barrel (or wooden barrel)
- Spigot
- Overflow and hose connectors
- Rubber gasket
- Downspout flex-elbow connector
- Cylinders
- Screening material
In addition, you will need the following tools:
- Needle nose pliers
- Box cutter
- Measuring tape
- Hacksaw
- Trowel
- Mallet (rubber)
- Screwdriver
- Level
- Plumbers tape (or caulk)
Step 1: Selecting the Best Location
Find a location next to your house with a downspout that can be easily redirected to your rain barrel. The space should have a flat, stable surface and be easily accessible for maintenance.
Once you have found a suitable location on your property, follow our DIY rain barrel instructions!
Step 2: Preparing the Rain Barrel
- Clean the barrel thoroughly inside and out, then flip it upside down to dry.
- Place an overflow connector on the side of the barrel, using a hole saw to drill the appropriate-sized hole.
- Trace an opening on the top of the barrel for the downspout connector, and cut out the hole with a jigsaw.
- Secure a piece of screening material over the opening to prevent debris and insects from entering the barrel.
Step 3: Assembling Components
- Attach the bottom spigot to the lowest part of the barrel to make water extraction easier.
- Wrap the spigot's threads with plumber's tape or caulk and screw on a bulkhead fitting to create a watertight seal.
- Drill a hole high on the barrel side to install an overflow connector, and secure it with a hose clamp.
Step 4: Connecting and Securing the Barrel
- Use a hacksaw to cut the downspout at the chosen location, leaving enough space for the flex-elbow connector.
- Connect the downspout to the rain barrel using the flex-elbow connector, and adjust the fit so rainwater is directed into the barrel.
- Ensure the barrel is stable by placing it on a level surface or using a platform to raise the barrel off the ground. This will also make it easier to fill watering cans or attach hoses to the spigot. A hose adapter may be necessary if compatibility is an issue.
Step 5: Adding Accessories
Consider including additional features, such as a rain chain, for aesthetics and improved water flow.
For added convenience and water conservation, attach a soaker hose, garden hose, or drip irrigation system to the spigot. This can also provide some water pressure for gardening and watering needs.
Benefits of Rain Barrels
DIY rain barrels provide numerous advantages for homeowners and the environment alike.
1. Reduced Reliance on Tap Water
Firstly, they allow for the collection of rainwater, reducing tap water usage for outdoor purposes such as gardening and irrigating plants.
Water shortages are a problem in many regions and we can greatly reduce our reliance on local water supplies by setting up rain barrels at home.
2. Soft Water (no additives)
Rainwater is naturally soft and free of minerals, making it a better choice for plants than tap water, which often contains additives like chlorine and fluoride that can be harmful.
3. Reduces Storm Water Runoff
Moreover, rain barrels minimize stormwater runoff, a significant contributor to pollution in rivers, lakes, and oceans.
By collecting and storing rainwater, you prevent it from flowing directly into storm drains and picking up pollutants along the way.
4. Water Bill Savings
Rain barrels can save homeowners up to 1,300 gallons of water during the hot summer months.
Not only does this reduce how much water you use from your local water source, but it can also amount to big savings on your monthly water bill.
5. Promotes Water Conservation
Rain barrels serve as an excellent educational tool, especially for children. They provide an easy way to teach the importance of water conservation and the value of natural resources.
With the simple installation of a rain barrel, homeowners can demonstrate sustainable practices in their own backyards.
Rain Barrel Maintenance Tips
Maintaining a rain barrel is essential for its longevity and effectiveness.
Clean Your Rain Barrel
If this is your first rain barrel, it can be easy to overlook the importance of keeping it clean.
Regular cleaning and inspection ensure optimal performance and prevent issues, such as stagnant water or damage from freezing temperatures.
Winterization
First, it's important to drain your rain barrel before winter to prevent water from freezing and cracking the barrel.
That said, if you do not live in a region with freezing temperatures, feel free to use your rain barrel all year round!
Prevent Contamination
Even if you don't reside in an area with freezing temperatures, draining your barrel regularly avoids stagnant water and potential health hazards.
Additionally, you should be cautious when treating your roof for pests or wood-related issues.
Unhook your rain barrel for at least two weeks during such treatments to avoid contamination.
Always Use Safe and Reliable Materials
When selecting materials for your rain barrel system, ensure they are safe and durable. Avoid using lead-based solder in all metal-to-metal connections to limit health risks.
Inspect Your Rain Barrel
Inspect your rain barrel and remove debris, such as leaves and dirt, to prevent clogs and ensure proper water flow.
I recommend doing this at least every week or two, especially during the fall months when leaves and debris are more common.
Position the Rain Barrel Appropriately
Lastly, remember that proper placement is crucial. Always face the spigot and overflow valve away from your home, and choose a location with a stable, flat surface to prevent tipping or damage.
Safety Considerations
When it comes to setting up your rain barrel, safety should always be prioritized!
Accident Prevention
Once your rain barrel fills up with water, it weighs a lot! A full 55-gallon rain barrel can weigh around 450 pounds, so it is crucial to create a solid, level, and flat base to prevent tipping and potential accidents.
Create an Overflow System
Make sure to include an overflow system to ensure excess water is properly directed away from your home's foundation. This prevents water damage and keeps your barrel functioning efficiently.
Many people who own rain barrels often have to deal with too much water entering their system, which ultimately floods their property. If overflowing becomes an issue, you can always decide to add a second barrel to catch even more water.
Filtration System (for drinking water)
In case you want to use collected rainwater for drinking, proper filtration techniques are necessary.
The simplest method is microfiltration, which involves gravel, sand, and charcoal. More sophisticated methods include UV sterilization and ozonation.
It is important to consider how the rainwater enters the barrel. Some methods include downspout diverters or mesh filters that prevent debris from causing clogs in the system.